React SPA: Live Photo and motion photo webui for browser context
Introducing my new work, motion live photo webui, or MLPW for short. The name is a blend of “motion photo” and “live photo”, and it also carries a double meaning of “rhythmic life.”
After finishing the live photo component for my blog, I started thinking about a web UI uploader for live photos, similar to the R2 uploader. The initial idea was simple: use ffmpeg.wasm to compress images and videos (splitting them first if it’s Google’s single JPG format), and then upload them to the cloud via browser XHR.
Since I was building a Single Page Application (SPA), React was the obvious choice! It was a great opportunity to practice and get my feet wet with React. So, what started as a simple goal ended up as a feature-rich smorgasbord 🥘, including things like: 📌 creating Google-style single-file motion photos, converting videos to live photos (by extracting a frame for the cover), a Web Hook UI, and more… For a full list of features, check out the project’s README.
As a React newbie 🐣, the development process was full of bumps and bruises, with flaws that required various workarounds. 📌 For example, ffmpeg transcoding would sometimes fail, either due to insufficient memory or just getting stuck for no reason. To address this, I added a cancel button and an option to manually adjust command-line parameters. Browsers aren’t omnipotent; for some heavy-duty transcoding tasks, 📌 like converting images to AVIF or HEIF, or generating AV1-encoded videos, they fall short. 💡 So, I came up with another solution: integrated a ☁️ cloud transcoding feature into the upload module, which only requires configuring a custom API. As for the same-origin policy restrictions on uploads, you can set up your own CORS proxy or, more directly, download the separated image and video, transcode them manually, and then use other tools to upload.
There won’t be any principles and differences between motion photos and live photos here. Instead, let’s dive into the various functional modules of MLPW and talk about the little ideas and details.
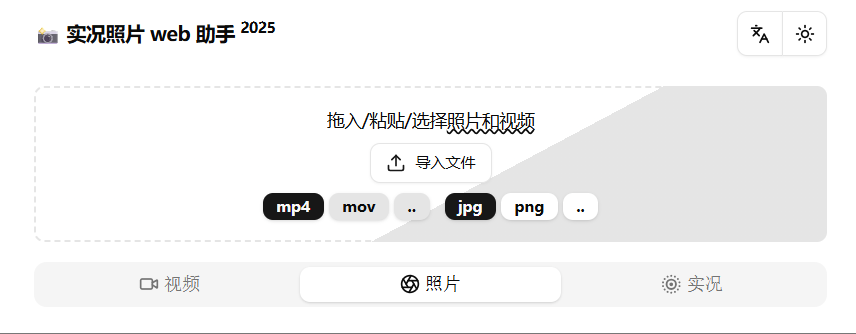
🗝️ File Loading: Where It All Begins
Every operation starts with importing a file. In theory, common image and video formats are supported. Native HEIC can’t be displayed in the browser, so MLPW automatically calls heic-to to convert it to a standard JPG. For other image formats, it first tries to extract them as live photos (🖼️ and 🎥). If that fails, they are imported as normal images. All imported files (whether extracted/converted or not) are treated as {RAW} class, including 🖼️ extracted via the [File Conversion module](#⚙️ File Conversion: The Core Function). Newly imported RAW files overwrite old ones by default, and the corresponding {CONVERTED} class files are also destroyed. There’s one exception: when a video extracted from a live photo is about to overwrite an existing RAW video, a confirmation dialog will pop up, since importing an image to overwrite a video is a bit counter-intuitive 🙅.
📺 Multimedia Display: WYSIWYG
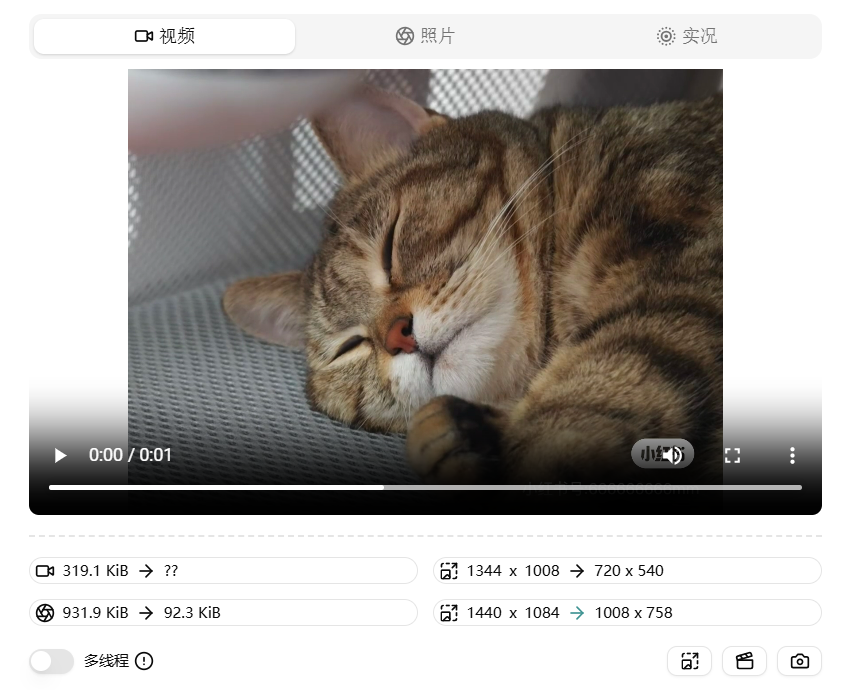
After a successful file import, you’ll see the status of the three tabs change. If you encounter playback failure with newer video encoding formats like H265, don’t panic. This won’t affect subsequent transcoding operations. The successfully transcoded CONVERTED video will automatically replace the unplayable RAW video. In other cases, the 🎥 tab only displays the RAW video. After transcoding, the 🖼️ tab will show a compare slider, similar to Squoosh’s slider, to easily compare the image quality difference before and after compression. The  live photo control refreshes every time you switch to it and prioritizes loading CONVERTED files.
To provide the most authentic experience, I used Apple’s official LivePhotosKit JS for displaying live photos. You can achieve a similar effect with CSS, and it has many advantages. The principle is not complicated: the core idea is to fade out the original image while zooming in and fading in the video.
⚙️ File Conversion: The Core Function
Most of the operations here are driven by ❤️🔥ffmpeg.wasm❤️🔥. For convenience, I used the unpkg source directly. After the first successful load, subsequent loads will be read from the browser cache, eliminating the need for repeated downloads. Switching between single/multi-threaded mode requires reloading the library file, so if you encounter strange transcoding issues, try switching threads or reloading the library. It’s often more effective than refreshing the entire page. Before transcoding, remember to check the options in the dropdown menu; by default, it processes both 🖼️ and 🎥. If you want to fine-tune the ffmpeg parameters before execution, for example, using
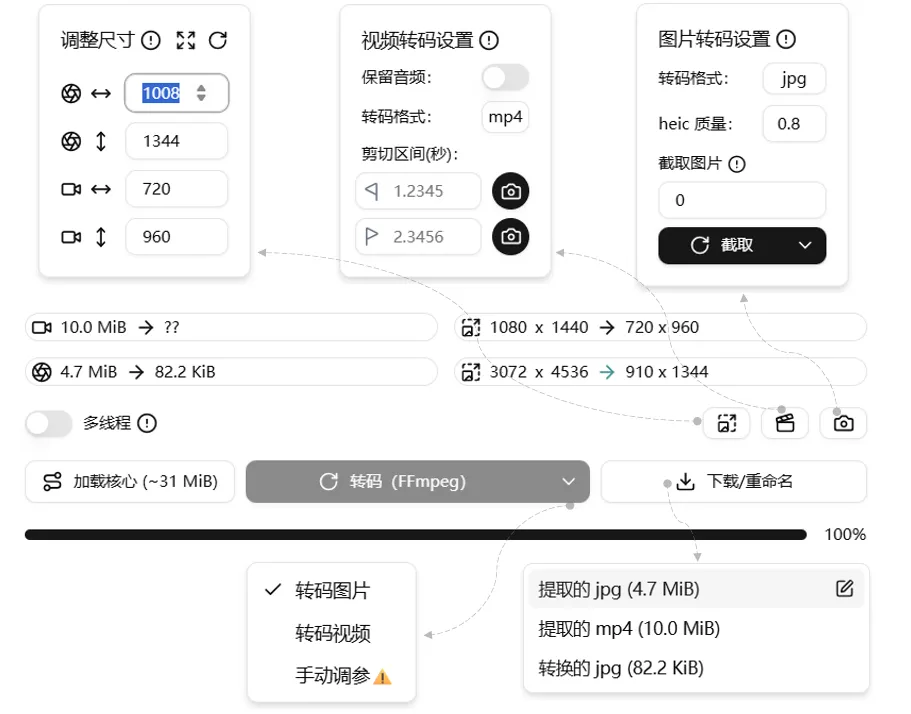
-qscale:v to control image compression quality, just check the ✔️Manual Parameters box. ⚠️Friendly reminder: do not modify the input and output filenames in the parameters. Clicking the download button will expand a dropdown menu; click the title again to start the download. The button next to it allows you to change the filename (without the extension), and this name will be used for both downloading and uploading.The 2x2 labels above the buttons show the file size and (expected) resolution for 🖼️ and 🎥. The left side of the arrow is RAW, and the right side is CONVERTED. After the conversion is complete, the → on the right will turn a prominent green.
The three buttons to the right of the multi-thread switch correspond to Resize, 🎬Video Transcoding Settings, and 🖼️Image Transcoding Settings.
I was once misled by this article, thinking that LivePhotosKit had strict requirements for resolution and format. In reality, it doesn’t restrict resolution, nor does it mandate JPG format, but it really can’t play H265 encoded videos, even if the browser itself supports it. Nevertheless, I still set a friendly default maximum size for web display: 🖼️1008 x 1344 and 🎥720 x 960 (maintaining the aspect ratio). You can reset this at any time with the ⟳ button in the top right corner of the pop-up, or click ⛶ to keep the original size.
🎬 Video settings include whether to keep audio, set the transcoding format (mp4, mov, and webm), and precise trimming. Drag the 🎥 progress bar to your desired position and click 📸 to record the start and end timestamps. If the RAW video cannot be played, you can manually enter the time or transcode it first and then trim it. Additionally, the transcoding format selected here will also affect the extension of the file returned after cloud transcoding (unless you’ve hardcoded it in the API URL).
🖼️ Image settings include transcoding formats (jpg, png, and webp). Currently, there are no parameters for output quality, but if you really need it, you can use manual parameter tuning as a workaround. The HEIC quality factor only takes effect when importing heic/heif images. The screenshot function allows you to easily extract a cover from the video. By default, it will grab the playback progress of the 🎥 when you open the pop-up. You can choose to capture from the original or transcoded video, or just modify the timestamp value. This value will be used for the live photo component’s data-photo-time attribute, as well as the relevant fields in the XMP tags when creating a live photo.
🚩 The following modules are relatively independent. Click the module title to collapse/expand.
✨ Create Live Photo: Prioritizing OPPO
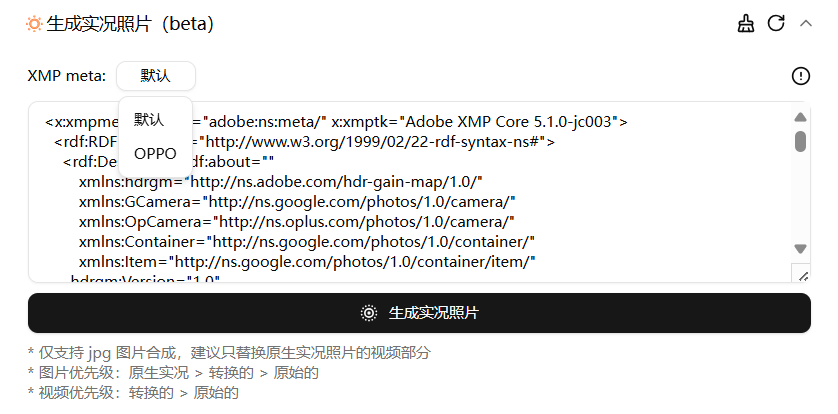
This feature was added last, with a clear goal: use any image 🖼️ and video 🎥 to create a live photo that can be recognized by the native photo album. JuziJun implemented a simple creation function ƒ that can be recognized by
 Google Photos and Windows Photos. The key is to write the correct XMP tags. Tests found that photos created with the original ƒ could be recognized by the latest versions of TikTok and
  Xiaohongshu, but not by the native photo album on ColorOS. By chance, I discovered that single-file live photos saved from Xiaohongshu could be perfectly recognized by my phone’s photo album! After some research with WinHex, I found the secret: just replace the EXIF part of the file created by MLPW with the EXIF part from the image saved by Xiaohongshu, and you get perfect compatibility 🎉!
So, if you are using an OPPO series phone, you just need to switch to the corresponding XMP meta preset to export the correct live photo. Since I don’t have other brands of phones on hand, the adaptation plan has to be put on hold for now. However, I tried it out at an offline experience store, and both Xiaomi and Honor only export live photos from Xiaohongshu as two separate files, so I guess it will be even more difficult 🤔. Recently, ColorOS updated a video 🎥 feature, but it only allows a maximum of 3 seconds, while the live photos exported by MLPW have no time limit 😎.
If you import a live photo, MLPW will, by default, extract the embedded XMP fields into the input box. If the extraction fails, it will display the currently selected preset value. Clicking the in the upper right corner can clear the input box, and clicking ⟳ can restore the initial XMP data from when the image was loaded.
☁️ Upload & Cloud Convert: Connecting to the Cloud
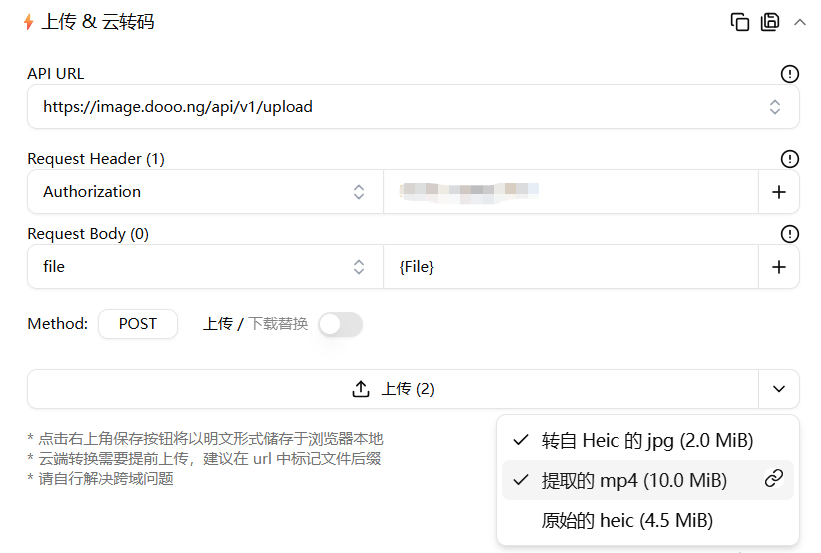
The Web Hook feature is implemented via XHR and supports four HTTP requests: POST, PUT, DELETE, and GET. You can customize the request headers, and the POST method also supports setting the request body. For example, when using the WebDAV protocol, you need to use the PUT method and add two key headers:
Authorization: Basic btoa(USERNAME:PASSWORD) and Content-Type: application/xml. Clicking the 💾 in the upper right corner can save the current server configuration (in JSON format), which will then appear in the API URL dropdown menu. The ⿻ button next to it is for importing and exporting configurations. If you have a valid configuration in your clipboard, it will directly write it to local storage or ask if you want to overwrite; if not, it will actively copy the current configuration to the clipboard, making it easy to migrate configurations between different devices.Currently, I have successfully tested 📌Junze’s Dooong public image host, 📌R2 Uploader, and 📌a PHP script . In theory, any standard RESTful API should be compatible. In the API URL, you can use
 {filename} to represent the filename, and in the request body, use {File} to represent the uploaded file itself. The biggest challenge is still the cross-origin issue. A feasible solution is to compile it into a native App or use a CORS forwarding server 🖧 to solve it.
To make it easier to use the uploaded file links, a one-click copy filename button has also been arranged in the dropdown menu ✌.
Cloud conversion ☁️ is essentially using GET requests to access URL-based transcoding services. 📌Well-known public services like WebP Cloud Services and Cloudflare Image both offer a certain amount of free quota. Each free account gets 5000 free conversions per month, and it’s very simple to use:
- First, go to the Cloudflare dashboard and enable the transformation service for your domain on the Images👉Transformations page.
- Upload the image to R2 cloud storage. Let’s say your image’s direct link is 🔗
https://image.yourdomain.com/raw.jpg. - Add conversion parameters to the link. 📌For example, to convert to webp format with a compression quality of 75, the link becomes:
https://image.yourdomain.com/cdn-cgi/image/format=webp,quality=75,fit=scale-down/raw.jpg.
To be able to explicitly specify the format after conversion, the final format to be filled into the API URL should look like this:https://image.yourdomain.com/cdn-cgi/image/format={webp},quality=75,fit=scale-down/{filename}. Here, {filename} will be replaced with the RAW filename, and {webp} will be used as the suffix for the cloud-converted file.
📖 Log: Real-time Recording
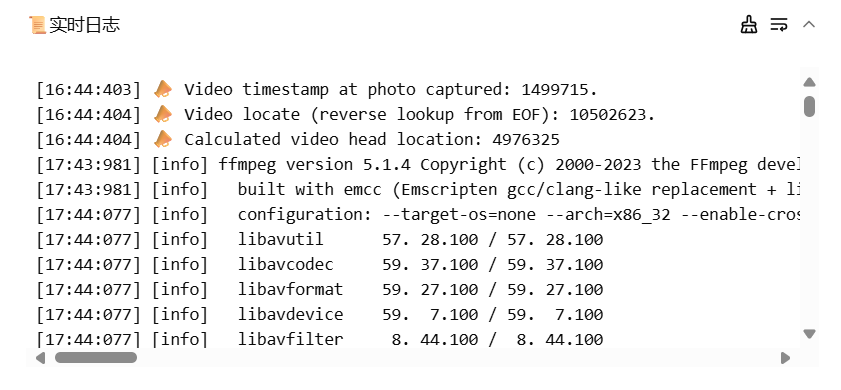
All operation records will be displayed here. Scrolling to the very bottom will also trigger auto-scrolling for easy real-time tracking.
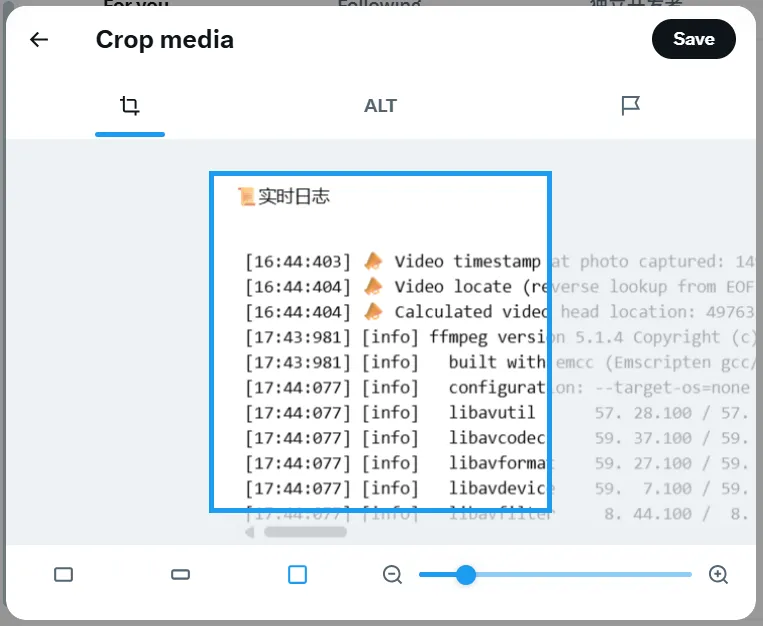
After more than a month of learning and polishing, MLPW has, in my opinion, reached a usable state, so I wrote this article to share and document it. Of course, it still lacks compatibility testing for models other than OPPO 📱, and there may be some bugs hidden in special scenarios 🐞. Currently, the feature I use most is separating and compressing live photos taken with my phone, and then uploading them to my blog as an image host. In the future, the feature I most want to add is cropping , to achieve a cool media editing effect similar to the web version of 𝕏.
🆕 Important Updates (Lines 84-96 Translation)
2025.8.27

- Xiaomi’s gallery app (including third-party apps) can now correctly recognize the synthesized Live Photos.
- Implemented cross-origin access via a Tampermonkey userscript. Install it here: https://greasyfork.org/zh-CN/scripts/547102-cors-plugin-for-motion-live
2025.8.18
Adjusted the video transcoding settings page and added a
2025.8.17

The Resize module now integrates react-easy-crop to enable image cropping, rotation, and flipping. The plugin also supports video, but since there’s already a video snapshot feature, unifying on image-based cropping keeps the component simpler. A small quirk: if a CONVERTED image exists, the UI only shows the comparison slider—so how do you re-crop? As a workaround, the action to clear the CONVERTED image is tucked into the crop toggle. One remaining issue: what if you only want to rotate without cropping? For now that likely needs a separate option.
